
Examples of Animation Curves in Unity
- Slaveyko Slaveykov
- Nov 12, 2022
- 3 min read

Hey everyone, I've been quite busy so unfortunately this week's blog will be a shorter one.
I was doing some 2D animations this last week and I found two new (to me) uses for Animation Curves that you might find interesting.
Projectile Arc
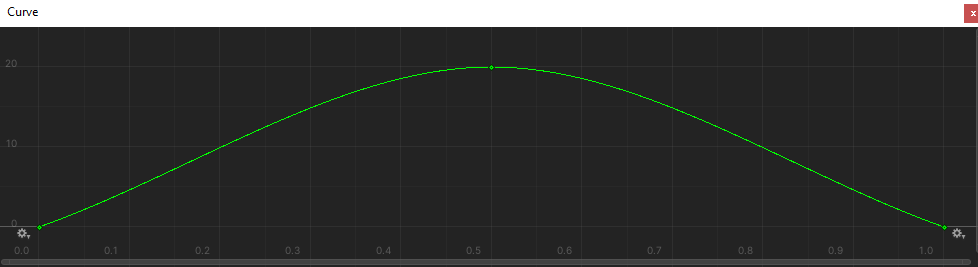
Not the most original I know, but you can very easily translate an animation curve to a literal arc in world or UI space. If you do this use time 0 to 1. For example, I have projectiles that fly from the player to the enemy (doh), I use an animation curve to predetermine a y axis offset in a scriptable object. You can very easily determine the distance between two points in percentages and Evaluate the height from the animation curve. This is done every frame. Keep in mind also that the affected axis offset (y in my case) of the object will not change based on the distance between two points. A projectile will be offset 50 units at the apex at any distance if that is the value at the apex of the animation curve. Applying the offset is a bit tricky. The best way I've found is to take the difference of y between the two points, multiply by the percentage of distance the projectile is at, add that to the Evaluated value from the curve and set the object position axis (y) to that number.
A couple of notes. Yes, I'm aware this is easily achieved by programming a sine curve! The above solution should only be used for features that require a highly customizable (and instantly visualised) arc where a designer or a developer will create the assets. Or you're a solo developer and don't have the time to mess with a lot of math. Secondly, this solution wouldn't work well for fast moving characters. Only use if the projectiles are very fast or the characters will be stationary. Thirdly, I've only described a 1 dimensional solution, there's nothing to say you can't use a second curve and give the projectile a wavy second axis (x for example).
Rotation

This one is simpler... and not, I'll explain in a second why not, but first the basics. Every frame, Evaluate the value from the animation curve based on a distance percentage between the two points, then apply to the transform axis using "Rotate(float float float)" (z axis in my case). Because Rotate is additive the value has to be consistent (In the screenshot above, the speed is lowered towards the end to represent the rotation slowing down).
This get's a little more complicated when you have objects like a paper aeroplane... or a dagger. Objects that would fly with a minimal rotation. In fact their rotation follows the arc. There are plenty of more complicated ways to achieve this OR you can reuse the above rotation code.
Here's how:

Impart rotation in the beginning and then slowly rotate opposite the starting rotation. Using this method you can get an arcing paper airplane that starts pointing up then gradually starts pointing down as it flies or a paper wad rotating steadily (I have paper on the mind).
Conclusion
That's it for this week, sorry about rushing a bit but like I mentioned I've been busy with some cool stuff that I can hopefully show off next week. Until then have a great weekend and an even better week!


Comments